

To develop, test, and train within sandboxes efficiently and with as few errors as possible, sandboxes need to be configured and populated with data that mirrors the source environment as closely as possible.
To accomplish this, Salesforce offers several native applications to its customers, including Sandbox Refresh and Sandbox Cloning. In addition to these methods, users can also import data into their Salesforce sandbox using either the Data Loader application or the Data Import Wizard tool.
This post will take a closer look at importing using the Data Loader option, which allows you to import a higher number of records than you can with the Data Import Wizard. Still, the steps are generally similar for both tools.
What is Data Loader?
Before we outline the steps to import data using Data Loader, a quick primer on the tool itself. Data Loader is a client application used to insert, update, upsert, delete, or export a large amount of Salesforce records. When importing data, Data Loader reads, extracts, and loads data from comma-separated values (.CSV) files or a database connection. When exporting data, it outputs .CSV files.
You should use Data Loader when you need to:
- Load 50,000 to five million records,
- Load into an object that is not supported by the Data Import Wizard, or
- Schedule regular data loads, such as nightly imports.
7 Steps To Populate a Salesforce Sandbox Using Data Loader
Data Loader’s seamless integration with the Salesforce platform makes it a popular tool to use for importing and exporting data to and from Salesforce. The upsert function is also a helpful feature, as it allows users to update existing records while inserting new records at the same time.
The downside of using Data Loader to populate a sandbox or production environment is that it’s a very manual process, requiring multiple steps (more on that below). It’s also very difficult to recreate relationships where records have multiple parents, intra-object relationships, and attachments.
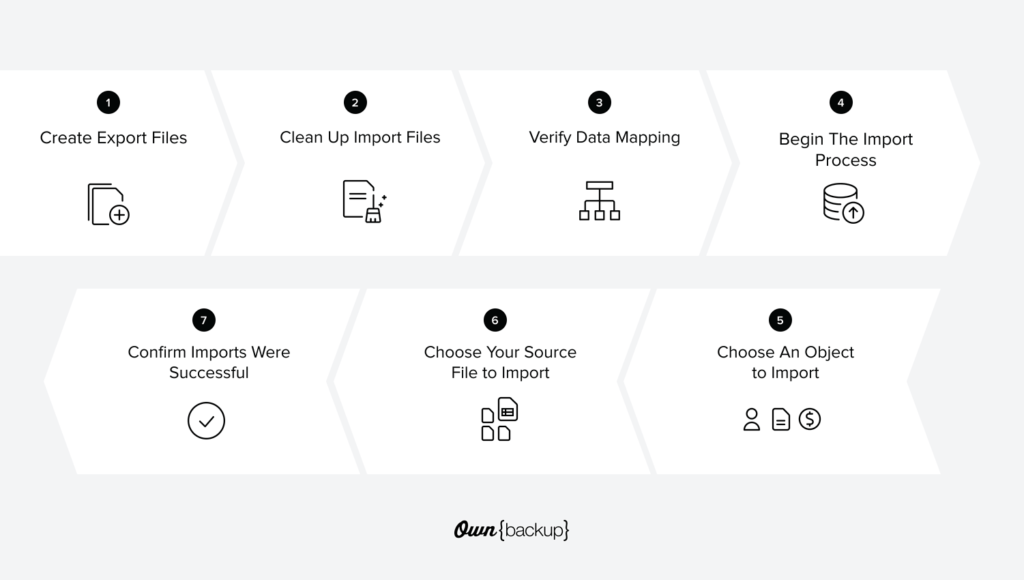
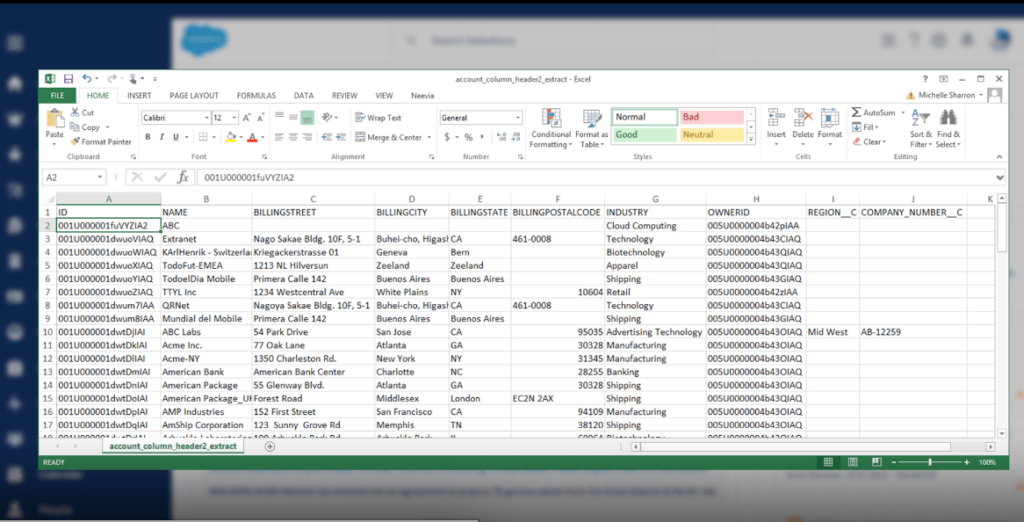
1. Create Export Files of The Data You Need
To use Data Loader (or Data Import Wizard), you’ll first need to export .CSV files of your data. You can only insert one object at a time, so you will need to create a separate .CSV for each object that you want to import. These objects can include accounts (parent), contacts (child), opportunities (child), and custom objects (lookup).
While this process can be manual and time-consuming, it’s critical to maintain parent-child relationships when populating a sandbox. Sandboxes with inaccurate data can lead to bugs and allow errors to slip into production, even if you thought you had thoroughly tested in your sandbox.
Several other things to keep in mind when exporting .CSV files:
- They are often stored on laptops or other less secure media and can create a potential IT security risk
- .CSV files don’t include Metadata, so you will have to rebuild custom settings and relationships manually
- You’ll need to create a directory structure and naming conventions to manage all of your import files
2. Clean Up The Import Files
Cleaning up each of your object import files may involve updating the records to remove duplicates, deleting unnecessary information, correcting spelling and other errors, and enforcing naming conventions. Having dirty data impacts accuracy, usability, and credibility. When users try to enter new contacts or opportunities, how do they know how to choose between duplicate accounts? And if revenue splits between duplicate accounts, how can you get an accurate tally by account?
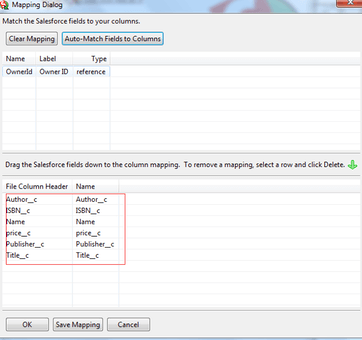
3. Verify Your Data Mapping
Before importing the records into Salesforce, you should compare your data fields in your import files with your org’s Salesforce fields. It is vital to verify that each data field maps to the appropriate corresponding Salesforce field.
Use an existing map if you have performed this type of object import before, or create a new one if this is the first time. You might need to fine-tune the mapping before starting the import. For details on this process, see this Salesforce Help article on Field Mapping for Data Sources.
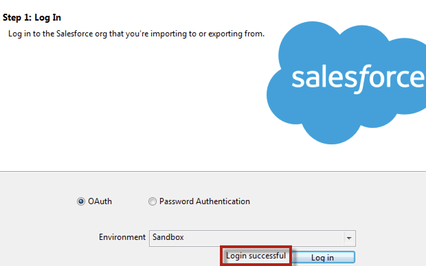
4. Begin The Import Process
The data import is a multi-step process on its own. This Salesforce Help article outlines the process in full detail. First, you’ll need to Open Data Loader and log in to Salesforce. If you’re using Data Loader to populate a sandbox, make sure to choose “sandbox” as the environment when you log in.
5. Choose An Object To Import
Next, you need to choose an object to import. Keep in mind that when restoring child objects, these should be an UPSERT instead of an INSERT.
Suppose you are performing an upsert, your .CSV file must contain a column of ID values for matching against existing records. The column is either an external ID (a custom field with the External ID attribute) or ID (the Salesforce record ID).
If your file includes an object’s external IDs that have a relationship to your chosen object, enable that external ID for record matching by selecting its name from the dropdown list. If you make no selection, you can use the related object’s ID field for matching by mapping it.
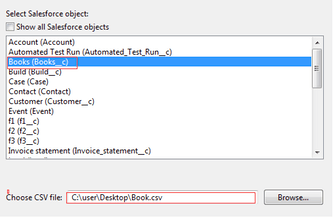
6. Choose Your Source File (.CSV File) To Import
When importing .CSV files into Salesforce, the processing order of the files is important. As we said earlier, be extra careful here. Establish the parent object records first to generate new ID values. Then, add the child object records to rebuild the correct relationships to each parent record.
7. Check Error Logs To Confirm Imports Were Successful
As the operation proceeds, a progress information window reports the status of the data movement. If everything went well, there would be “successes,” otherwise investigate the errors and make the necessary mapping corrections.
REMINDER: You will need to repeat steps 5-7 for each of your import files.
Key Takeaways
As we stated at the beginning of the post, the process to populate a sandbox by importing .CSV files into the Salesforce Data Loader can be complicated and involves many steps. If you are going to go this route, make sure you set aside plenty of time--even weeks depending on how many records you plan to import.
Importing some of the more common relationship types such as master-detail, many-to-many, and lookup are challenging enough. Other relationships will require performing multiple inserts, updates, or upserts on the same table to properly restore the records, like records with multiple parents, polymorphic fields, intra-object relationships, and attachments.
In addition, you could also run into complications with the files themselves if something went wrong during the download process or the storage media and files become corrupted.
Innovate Faster, with Less Risk
As an alternative solution, consider Own Accelerate. Accelerate is an intuitive and powerful sandbox seeding solution for organizations that want to maximize their Salesforce platform for training, development, or testing. Salesforce administrators and developers can easily seed quality data to any sandbox with desired objects and records while maintaining all relationships and masking all sensitive information.
Rather than having to start from scratch each time you want to seed, Accelerate provides reusable templates to define more datasets. This way, you start with only the specific data you need and add more data as you go, rather than beginning with all of your data and trimming down.
And instead of manually importing each parent and child object at a time, all you have to do is identify the root object and add any number of associated parents, children, or additional roots to include. Best of all, those relationships will stay intact when you're ready to seed.
To learn more, check out "The Ultimate Guide to Sandbox Seeding in Salesforce", or request a demo below.
.png)